How to Safely Remove Your Gun Safe Door
Many gun owners know the feeling of wanting to remove their gun safe door but aren’t sure where to start or worry about safety.
You’re not alone—this can be a tricky task, especially if you’re not familiar with the process.
To safely remove your gun safe door, start by clearing your workspace and gathering the right tools like screwdrivers and a pry bar.
Confirm the safe is empty and secure, then carefully identify and remove the fasteners and hinges holding the door in place.
Support the door while removing screws to prevent accidents.
Take your time, follow safety precautions, and double-check everything.
If you want detailed steps and tips, keep exploring to do the job right.
Key Takeaways
- Empty the safe completely and secure all contents before starting removal.
- Gather the right tools—think screwdrivers, pry bars, and gloves for safety. It’s better to be prepared than caught off guard.
- Carefully identify and remove the fasteners, hinges, and mounting brackets. Take your time so nothing gets damaged or lost.
- Support the door during removal to prevent dropping it or causing injury. You don’t want it falling unexpectedly.
- After removing the door, inspect the hinges and locking mechanisms. This is a good chance to check for any issues and plan for reinstallation or maintenance.
Getting Your Workspace Ready and Tools You Need
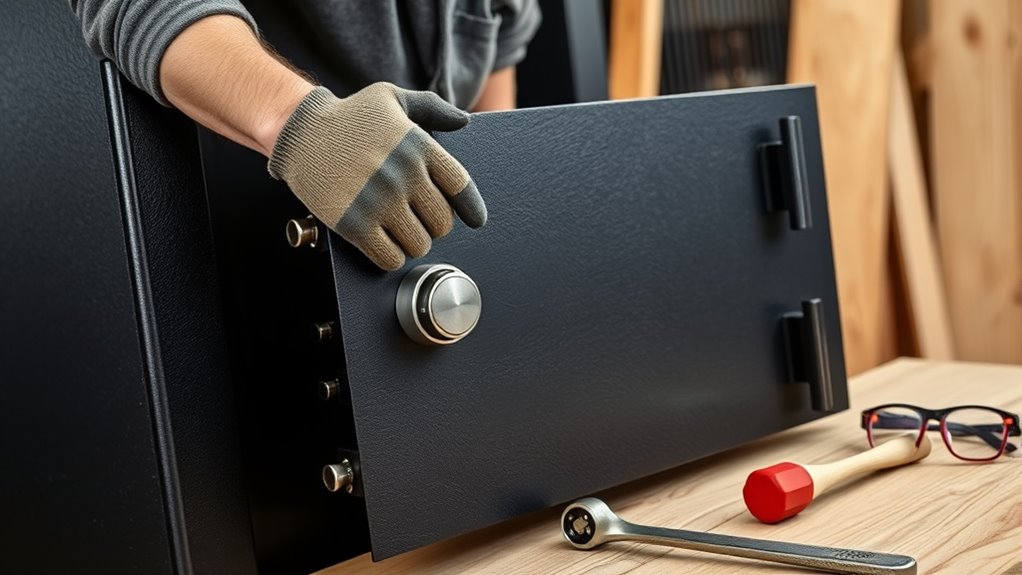
Before you start removing the gun safe door, it’s important to set up a clean, organized workspace. Clear away any clutter and make sure there’s enough room to work comfortably.
Gather all the tools you’ll need—usually a screwdriver, socket wrench, and maybe a pry bar. Keep a container nearby to hold screws and small parts so they don’t get lost.
Wear gloves to protect your hands, and consider using a flashlight to see better in tight spots. Make sure your workspace is stable and flat to prevent accidents.
If the safe is electronic, double-check that it’s unplugged or not connected to any power source. Preparing your workspace and tools in advance will make the removal smoother and safer.
Safety Tips Before Removing Your Gun Safe Door
Since removing a gun safe door involves handling heavy and potentially awkward components, it’s crucial to prioritize safety to avoid injury or damage. Before you start, make sure to wear sturdy gloves and safety glasses to protect your hands and eyes.
Clear the area of any obstacles to prevent tripping or accidental drops. Double-check that the safe is empty or securely locked so items don’t fall out during the process.
Use proper lifting techniques—keep your back straight and lift with your legs. Here’s a quick safety checklist to keep in mind:
| Safety Tip | Why It Matters |
|---|---|
| Wear gloves and glasses | Protects against sharp edges and debris |
| Clear the workspace | Prevents accidents and injuries |
| Confirm safe locking | Avoids accidental opening or falling items |
| Use proper lifting | Prevents back strain and injury |
Emptying and Securing Your Safe Properly
To safely remove the gun safe door, start by emptying the contents and securing the safe properly. This helps prevent damage or injury during the process.
First, carefully take out all firearms, ammunition, and valuables, then place them in a secure location. Double-check that the safe is completely empty to avoid accidental damage.
Remove all firearms, ammunition, and valuables, then double-check the safe is fully empty before proceeding.
Next, lock or secure the interior components to prevent anything from shifting or falling inside. Removing the door with a clear, empty safe makes the process safer and easier.
It also protects your belongings from falling or getting lost. Always handle everything with care and make sure the safe is stable before you detach the door.
This step is essential for a safe and smooth removal.
Identifying Fasteners and Hinges on Your Safe Door
Start by checking out your safe door to see what kinds of fasteners are there, like screws or bolts. Take note of where they are placed.
Look at the hinge patterns to understand how the door is mounted. Different safes can have different hinge setups.
Finally, find the locking mechanisms and see how they connect to the fasteners and hinges. This will help you figure out how to remove the door more easily.
Types of Fasteners
Identifying the fasteners and hinges on your safe door is an important first step in removing it. Knowing the types of fasteners helps you pick the right tools and avoid causing damage.
Common fasteners include screws, which are usually Phillips or flat-head types. These are the most common for securing hinges and panels. Be sure to check their length and head type before you start unscrewing.
Bolts and nuts are often used to secure hinges or locking mechanisms. You might need a wrench to loosen these. Rivets are permanent fasteners that might require drilling out if they’re used on hinges or other parts.
Recognizing these fastener types ensures you approach removal carefully. This reduces the risk of damaging your safe or its components.
Hinge Placement Patterns
Examining the pattern of hinges on your safe door helps you understand how it’s mounted and where the fasteners are located. Look closely to see if the hinges are on the inside or outside of the door.
Interior hinges are usually concealed, with fasteners hidden behind the door frame. Exterior hinges are visible along the edge of the door.
Check the number of hinges—most safes have two or three—and observe how they are spaced. Some safes use continuous or piano hinges, while others have discrete hinges at specific points.
Identifying this pattern helps you figure out how the door is attached and where to focus when removing fasteners. Understanding hinge placement is a key step before you start removing the safe door.
Identifying Locking Mechanisms
To effectively remove the safe door, you need to find and understand the locking mechanisms that keep it in place. These can vary, but common types include bolts, latches, and electronic locks.
Start by inspecting the edges of the door for visible fasteners or screws that hold the lock in position. Then, look for any hidden or recessed areas where locking bolts might be engaged.
Next, determine whether the lock is mechanical or electronic, as this will influence your removal approach. Recognizing these features helps prevent damage and ensures a safe, controlled process.
Taking the time to understand how the lock works is essential before you try to remove it, especially if you’re unfamiliar with the safe’s design.
How to Remove Your Gun Safe Door Step-by-Step
To remove your gun safe door safely, start by gathering the right tools, like a screwdriver and possibly a wrench.
Follow the step-by-step removal procedure carefully, making sure to support the door as you work.
If you’re prepared and methodical, the process will be smoother and safer.
Prepare Necessary Tools
Gathering the right tools before you start will make removing your gun safe door much easier and safer. You’ll need specific tools to handle the job efficiently and avoid damaging the safe or hurting yourself.
Here are the essential tools to prepare:
A screwdriver (both flathead and Phillips) for removing screws and bolts.
A socket wrench set to loosen nuts and bolts securely.
A pry bar or crowbar to gently help move the door if needed.
Make sure your tools are in good condition to prevent slipping or stripping screws. Having everything ready beforehand helps you work smoothly and reduces frustration or accidents during removal.
Follow Removal Procedure
Begin by making sure the safe is unplugged or disconnected from any power source so you don’t accidentally get hurt.
Next, find the hinges or mounting brackets holding the door in place. Use your screwdriver to remove any screws securing the hinges or brackets.
Support the door carefully as you loosen the final screws to stop it from falling suddenly. Once all screws are out, gently lift the door away from the safe body, keeping a firm grip.
If the door is heavy, ask for help so you don’t risk injury. Check for any remaining pins or bolts that need to come out before fully detaching the door.
Follow your safe’s specific instructions if you have them. Take your time so you don’t damage anything or hurt yourself.
Handling Heavy or Large Safe Doors Safely
Handling heavy or large safe doors requires careful planning and the right technique to prevent injury or damage. Before starting, assess the weight and size to see if you need help or special equipment.
Handling large safe doors safely requires proper planning and technique to prevent injury or damage.
Always lift with your legs, not your back, to avoid strain. Use proper grip points to keep control and maintain your balance. Here are three key tips:
- Get assistance—enlist a partner or use a dolly for heavy doors.
- Clear the area—remove obstacles and make sure the path is free.
- Use proper lifting techniques—bend your knees, keep your back straight, and lift smoothly.
Taking these precautions ensures safety and helps protect your safe from accidental damage. Never rush and always put safety first when handling large or heavy safe doors.
Maintaining Your Safe During and After Door Removal
To keep your safe in good shape during and after door removal, check its alignment regularly to ensure everything works smoothly.
Properly lubricate hinges and moving parts to prevent wear and keep the safe operating properly.
Also, keep an eye out for signs of damage or wear so you can fix issues before they become serious.
Check Safe Alignment Regularly
Ensuring your safe remains properly aligned is essential during and after removing the door. Misalignment can cause issues with locking mechanisms or damage the safe over time. Regular checks help catch any shifting early.
To keep things aligned:
- Inspect the hinges and locking bolts for tightness and proper fit, tightening any loose screws or bolts.
- Check the door’s position relative to the safe body, making sure it sits flush without gaps.
- Test the locking mechanism by opening and closing the door, confirming smooth operation and proper engagement.
Regular inspections prevent misalignment from turning into bigger problems, helping your safe stay secure and last longer.
Use Proper Lubrication Techniques
Applying proper lubrication techniques is key to keeping your safe operating smoothly during and after door removal. Use a high-quality, dry lubricant or silicone spray to ensure hinges and locking mechanisms move smoothly.
Avoid oil-based lubricants that can attract dirt and debris. Apply sparingly to hinges, bolts, and contact points, then move the parts back and forth to spread the lubricant evenly.
Regular lubrication helps prevent rust and reduces friction, making future maintenance easier. Here’s a quick guide:
| Part | Recommended Lubricant | Application Tips |
|---|---|---|
| Hinges | Silicone spray | Spray lightly and move hinges to spread the lubricant |
| Locking bolts | Dry lubricant | Apply directly to threads |
| Internal mechanisms | Graphite powder | Use sparingly for smooth operation |
| Contact surfaces | Light silicone coating | Prevent rust and corrosion |
Proper lubrication keeps your safe functional and secure.
Inspect for Wear and Damage
Inspecting your safe for wear and damage is an important step before and after removing the door. It helps spot any issues that could weaken its strength or stop it from working properly.
Start by checking the hinges and locking mechanisms for rust, cracks, or deformation. Look for signs of wear on the door’s edges and locking bolts, which might show frequent use or stress.
Finally, examine the surrounding frame for warping or dents that could affect how the door fits. Address any problems you find promptly to keep your safe secure and working well.
Troubleshooting Common Issues When Removing the Safe Door
Removing a safe door can sometimes be tricky, especially if the locking mechanism or hinges are stubborn or misaligned. If you encounter resistance, don’t force it, as this could cause damage.
Check for any visible obstructions or debris that might be preventing smooth removal. Sometimes, hinges may be rusted or stuck, so a gentle lubrication with penetrating oil can help.
Check for obstructions or rust, and apply gentle lubrication to ensure smooth hinge removal.
If screws or bolts are stripped or stuck, try using a screw extractor or pliers for a better grip. Make sure all locking bolts are fully retracted, as they might still be engaged and block removal.
Patience is key. Work slowly and carefully to avoid damaging the safe or compromising its integrity. Troubleshooting these issues step-by-step helps ensure a safe, successful removal process.
How to Reinstall Your Gun Safe Door Safely
Reinstalling your gun safe door requires careful alignment and secure fastening to ensure safety and proper operation. First, position the door so that hinges and latches line up precisely with the safe’s frame.
Next, insert the hinge pins or screws, making sure they’re tight and fully seated to prevent wobbling. Finally, double-check that the door opens and closes smoothly without resistance.
To confirm a secure fit, follow these steps:
- Align hinges and latch with the safe frame before securing.
- Tighten all screws or pins firmly, but avoid over-tightening that could damage components.
- Test the door’s movement and locking mechanism to verify proper function.
Taking your time during reinstallation helps confirm the safe’s integrity and your safety.
When to Seek Professional Help for Safe Door Removal
Ever wonder if you should call in a professional when removing a gun safe door? If the safe is especially heavy or securely bolted, it’s best to get expert help.
Professionals have the right tools and experience to do the job safely and efficiently, which helps reduce the risk of injury or damage.
If you’re unsure about how the safety mechanisms work, or if the door is stuck or hard to detach, don’t force it—you could end up causing costly damage.
Plus, if your safe has electronic parts or complex locking systems, a professional can handle everything properly without compromising security.
When in doubt, hiring a pro saves you time, effort, and potential hazards, making the process safer and easier.
Essential Safety Tips Throughout the Process
Before you start removing the gun safe door, it’s essential to prioritize safety at every step. First, wear protective gear like gloves and safety glasses to prevent injuries from sharp edges or debris.
Second, confirm the safe is empty; a loaded safe can be heavy and dangerous to handle. Finally, work on a flat, stable surface to prevent slips or falls.
To stay safe:
- Keep your workspace clear of clutter to avoid tripping hazards.
- Use proper lifting techniques—bend your knees and lift with your legs.
- Handle tools carefully, avoiding sudden movements or excessive force.
Staying alert and cautious helps prevent accidents and guarantees the process goes smoothly. Safety always comes first when handling heavy or potentially hazardous equipment.
Final Checks to Keep Your Safe Secure After Reinstallation
Once you’ve reinstalled the gun safe door, it’s important to do some final checks to make sure everything’s secure and working right.
Start by inspecting the hinges and locking mechanism to ensure they’re properly aligned and tightened. Then, test the handle and lock to see if they operate smoothly without any resistance.
Next, check that the door closes fully and latches securely without any gaps. If your safe has electronic or keypad locks, make sure the keypad responds accurately and that the batteries are working.
Make sure the locking bolts engage completely and that the door stays firmly closed when locked. Finally, give everything a gentle tug to confirm the door remains secure.
Following these steps will help keep your safe reliable and ensure your belongings stay protected.
Frequently Asked Questions
Can I Remove the Safe Door Without Damaging the Safe?
Yes, you can remove the safe door without damaging the safe if you follow proper procedures.
First, make sure the safe is empty and open. Carefully locate and unscrew the hinges using the right tools.
Support the door with your hand as you detach it to prevent any accidental damage. Taking your time and using the proper equipment helps keep the safe intact and ensures a damage-free removal.
What Tools Are Best for Removing Different Types of Safe Doors?
Did you know that the right tools can cut safe door removal time by up to 50%?
Different safe doors need different tools, so choose wisely.
For electronic or mechanical locks, a power drill and screwdriver are your best bets.
Heavy-duty safes might require a pry bar to get the job done.
And for bolts, a socket set will usually do the trick.
Always wear gloves and eye protection for safety.
And be sure to follow the manufacturer’s guidelines to avoid damage or injury during removal.
How Do I Prevent Injury When Handling Heavy Safe Doors?
To prevent injury when handling heavy safe doors, always wear gloves and sturdy footwear to protect your hands and feet.
Use proper lifting techniques—bend your knees, keep your back straight, and lift with your legs.
Get help from a second person if the door is too heavy or awkward.
Clear the area of obstacles, and take your time to avoid slips, trips, or strains.
Safety first guarantees a smooth, injury-free process.
Is It Necessary to Have a Second Person Assist With Door Removal?
Yes, having a second person help with door removal is highly recommended. Heavy safe doors can be tough to handle alone, which can increase the risk of injury or damage.
Your helper can provide stability, assist with lifting, and guide the door safely during removal. This teamwork makes the process safer and easier.
It also helps reduce the chance of accidents. Always communicate clearly and coordinate your movements for the best results.
How Long Does the Door Removal Process Typically Take?
You’ll probably spend around 15 to 30 minutes removing your gun safe door, depending on your experience and the size of the safe.
As you get started, you might encounter some unexpected bolts or tight spots that slow you down. It can feel like a coincidence, but it’s pretty common.
Getting your tools ready and following the steps carefully can help make the process smoother. This way, you won’t waste time or risk damaging the safe or the door.
Conclusion
Removing your gun safe door is like freeing a caged bird—you need to handle it carefully to avoid damage or danger.
Just follow the steps carefully, and you’ll be opening a new chapter of safety and responsibility. Remember, taking off the door isn’t just about access; it’s about trust and protection.
With caution and respect, you can ensure your safe remains a guardian, not a risk. Whether you reconnect it later or leave it open, handle your gun safe door safely.