7 Simple Steps to Remove Glock Rear Sight
Removing the Glock rear sight can feel tricky, especially if you’re new to firearm maintenance. Many people struggle with this task and worry about damaging their slide or ruining the sight.
To remove your Glock rear sight, start by ensuring the firearm is unloaded and secure it on a stable surface. Use the appropriate tools, like a sight removal tool or small screwdriver, and gently lift the sight without damaging the slide.
If needed, loosen set screws with an Allen wrench. Apply penetrating oil for stubborn sights, then carefully slide the sight out.
Afterward, clean the slide and prepare for installing the new sight.
Keep going to uncover detailed tips for a smooth process.
Key Takeaways
- Make sure your Glock is completely unloaded and secure it on a stable surface before you start. Safety first, of course!
- Grab a sight removal tool or a flat-head screwdriver. Gently lift the rear sight, being careful not to scratch the slide.
- If there are any set screws, loosen them with an Allen wrench first. Once they’re out of the way, you can slide the sight off more easily.
- If the sight is stubborn or rusted, apply some penetrating oil. Let it sit for a few minutes before trying again. Patience is key here.
- Before installing the new sight, give the slide and dovetail area a good cleaning. This ensures everything fits perfectly and stays securely in place.
Tools Needed to Remove Your Glock Rear Sight

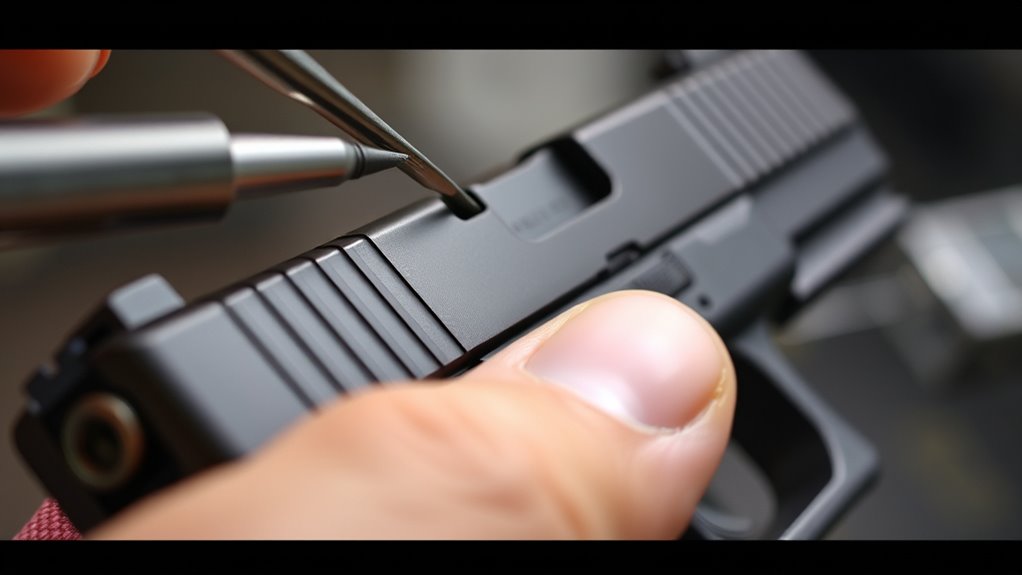
To remove your Glock rear sight, you’ll need a few specific tools. First, grab a Glock sight removal tool or a small flat-head screwdriver, which helps lift the sight without damage.
Use a Glock sight removal tool or small flat-head screwdriver to lift the rear sight safely.
You’ll also want a rubber mallet or a soft hammer to gently tap the tool if needed. A pair of pliers with rubber or plastic coating can help grip the sight or any stubborn parts.
Keep a punch or small pin to assist with precise removal if necessary. Finally, have a cloth or towel nearby to protect your firearm’s surface and prevent slipping.
These tools will help you remove the sight smoothly, avoiding scratches or damage. Make sure all your tools are clean and properly sized for Glock sights before you start.
How to Secure Your Glock Safely Before Removing the Sight
Before you start removing the Glock rear sight, securing the firearm is key to preventing accidents or damage. First, make sure the gun is unloaded by removing the magazine and checking the chamber.
Place the firearm on a stable, flat surface, preferably with a soft cloth underneath to avoid scratches. Use a vise or gun holder to keep the pistol steady and prevent movement during removal.
If you don’t have a vise, hold the firearm firmly with both hands, making sure your fingers are clear of any moving parts. Always keep the muzzle pointed in a safe direction.
Securing your Glock properly reduces the risk of slips, damage, or injuries while taking off the sight.
Removing the Glock Rear Sight: Step-By-Step
To remove the Glock rear sight, you’ll need a few basic tools like a punch or flat-head screwdriver.
Follow the step-by-step process carefully to avoid damaging your firearm.
Once you’re ready, you’ll be able to remove the sight smoothly and efficiently.
Tools Needed
Gathering the right tools is key for removing your Glock’s rear sight smoothly and safely. Without the proper tools, you risk damaging your firearm or not removing the sight correctly.
You’ll need a few specific items to make the job easier. First, a sight removal punch or a small flat-head screwdriver helps lift the sight without scratching the slide.
Next, a hammer or mallet provides gentle taps to loosen tight sights. A pair of pliers or tweezers can help grip and lift small parts if needed.
Finally, a cloth or towel protects your gun’s finish from scratches during the process. Having these tools ready ensures a safe, effective removal and minimizes the risk of damage to your Glock.
Removal Process
Start by making sure your firearm is unloaded and the slide is clear of any chambered rounds. Secure the pistol in a vise or on a stable surface so it won’t move around.
Use your chosen tool, like a punch or small flat-head screwdriver, to gently lift the rear sight. Apply steady pressure but avoid forcing it too hard, which could damage the slide.
If your sight has set screws, loosen them first with an Allen wrench. Once they’re out, carefully slide the sight out of its dovetail slot.
Be patient during this process because rushing can cause scratches or damage. If the sight resists, apply a small amount of penetrating oil around the base and wait a few minutes before trying again.
Make sure everything stays aligned so the removal goes smoothly.
Troubleshooting Common Glock Sight Removal Problems
Removing a Glock sight can sometimes be tricky, especially if the sight is stubborn or stuck. Using the right tools and following safety precautions helps prevent damage and injury.
If a sight gets stuck, there are specific methods to help you remove it safely without causing damage. Taking your time and being patient makes the process much easier.
Common Removal Challenges
One common challenge when removing a Glock rear sight is dealing with stubborn or tightly secured components. These sights can be tough to loosen, especially if they were installed with too much force or have corrosion.
You might run into issues like a stuck sight that won’t move, damage to the slide, or the sight slipping during removal.
To troubleshoot, think about these common problems: rust or corrosion making the sight hard to budge, over-tightened screws or adhesion, shifted or warped sights, or applying uneven pressure that could cause damage.
Being aware of these issues helps you approach removal carefully and avoid costly mistakes.
Tools and Safety Measures
When tackling stubborn Glock rear sights, having the right tools and following proper safety measures can make all the difference. Use a Glock-specific sight removal tool or a small punch that fits snugly into the sight’s notches to avoid slipping. A hammer with a soft face, like a rubber or nylon mallet, helps prevent damage.
Always wear eye protection to shield against flying debris or accidental tool slips. Clear your workspace and guarantee the firearm is unloaded before starting. Keep your hands steady and work in a well-lit area to maintain control.
Avoid excessive force, which can damage the slide or sight. Proper tools combined with safety precautions guarantee a smooth, safe removal process and reduce the risk of injury or firearm damage.
Fixing Stuck Sights
Dealing with stubborn Glock sights can be frustrating, especially if they refuse to budge despite your efforts. If your sight is stuck, don’t force it; this can cause damage. Instead, try these troubleshooting tips:
Apply penetrating oil around the sight and wait a few minutes to loosen corrosion or debris. Gently tap the sight with a brass punch to loosen it without damaging the slide. Use a heat gun carefully to expand the metal, making removal easier.
Double-check your tools to ensure you’re using the correct size and type. This helps avoid slipping or stripping screws. Patience and proper technique are key.
Rushing or using excessive force risks damaging your firearm and making the removal process more difficult.
Cleaning and Preparing the Slide for a New Sight
Before installing a new rear sight, it’s really important to clean and prepare the slide thoroughly. Use a cleaning solvent and a brush to get rid of dirt, carbon buildup, or old grease from the slide.
Pay special attention to the sight dovetail area to make sure it’s free of debris. Then, wipe the slide down with a clean cloth to remove any leftover residue.
Inspect the dovetail for any corrosion or damage. If you notice rough spots, lightly sand them down. Applying a small amount of lubricant to contact points helps prevent future corrosion.
This cleaning and preparation process creates a smooth, clean surface. It makes installing the new sight easier, more secure, and accurate.
Installing a New Glock Rear Sight: Tips for a Perfect Fit
Once the slide is clean and prepped, you can start installing the new rear sight. Handle the sight carefully and make sure it’s aligned properly with the slide’s grooves for a perfect fit.
Use a sight pusher or the right tool to press the sight into place, applying steady, even pressure. Don’t force it in, as that could damage either the sight or the slide.
Keep these tips in mind: confirm the sight is oriented correctly before installing, and use gentle, consistent pressure to seat it properly.
Check that the sight lines up with the slide’s rear edge. Using a punch or a block can help prevent slipping during installation.
Take your time and double-check the alignment. This will ensure a secure fit and optimal performance.
Final Checks and Safety Tips for Your Glock
After installing your Glock’s rear sight, it’s important to do some final checks to make sure everything is secure and working right. First, look at the sight to make sure it’s aligned properly and seated firmly. Gently wiggle it—there should be no movement.
Next, do a function check by racking the slide and pulling the trigger with an empty magazine and chamber. This helps confirm the firearm cycles smoothly. Always keep the gun pointed in a safe direction and make sure it’s unloaded during these steps.
Finally, take your Glock to the range for a test fire to see if the sight is accurate. Regular maintenance and checks are key for safety and precision, so make these inspections part of your routine after any sight adjustment or replacement.
Frequently Asked Questions
Can I Remove and Replace the Glock Rear Sight Myself?
Yes, you can remove and replace the Glock rear sight yourself with the right tools and some patience.
First, make sure your firearm is unloaded and secure it so it doesn’t move around. You’ll need a sight pusher or a brass punch to carefully tap out the old sight.
Once the old sight is out, carefully align and press in the new one, ensuring it’s securely in place. Always double-check your work and safety before firing.
What Are the Risks of Improperly Removing the Glock Rear Sight?
If you remove the Glock rear sight improperly, you risk damaging the slide or the sight itself. This can lead to misalignment, which affects accuracy, or cause the sight to become loose over time.
You might also scratch or mar the slide, reducing its value. To avoid these risks, follow proper procedures carefully or seek professional help.
Taking your time helps ensure safety and keeps your firearm reliable.
How Often Should I Replace My Glock Rear Sight?
You should replace your Glock rear sight whenever it becomes damaged, loose, or if you’re upgrading for better accuracy. Regular inspections can help you catch issues early.
Typically, sights last thousands of rounds, but environmental factors and how you use your gun can shorten their lifespan.
If you notice misalignment or visibility problems, it’s time to get a new sight. Stay attentive to your firearm’s condition to ensure safety and top performance.
Is Special Training Needed to Remove a Glock Rear Sight?
Removing a Glock rear sight is like peeling an onion—careful, deliberate, and with patience. You don’t need special training, but you should handle it with precision.
Use the right tools, such as a sight pusher or a punch, to avoid damaging your firearm. Follow step-by-step instructions carefully.
If you’re unsure, consider consulting a professional. Proper technique guarantees safety and keeps your Glock functioning perfectly.
Will Removing the Rear Sight Affect My Glock’s Accuracy?
Removing the rear sight doesn’t automatically affect your Glock’s accuracy if you reinstall it correctly.
But if the sight isn’t aligned properly or gets damaged during removal, it can impact your shooting precision.
Make sure to follow proper procedures or get help from a professional if needed.
Always double-check the sight alignment after reinstalling to ensure your firearm performs accurately and consistently.
Conclusion
Now that you’ve navigated the steps like a seasoned craftsman, your Glock is ready to shine brighter than a lighthouse in the night. With patience and care, you’ve turned a tricky task into a smooth dance.
Remember, every detail matters—like the final brushstroke on a masterpiece. Keep safety at the forefront, and your firearm will serve you reliably, a trusted partner on every adventure ahead.
By mastering how to remove the Glock rear sight, you’ve taken control of your firearm’s maintenance. Happy shooting!